How to Decide Where to Install a Kitchen Power Track Rail

Time:2026-11-07 Author:Henry
0%

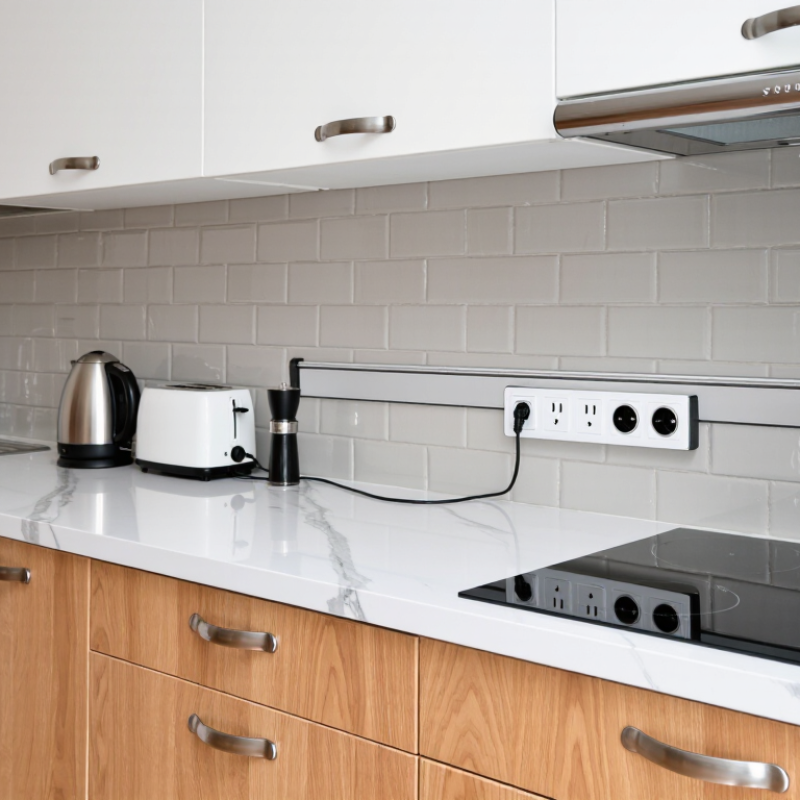
Choosing where to install a kitchen power track rail starts with observing how the kitchen is actually used. Note where the kettle, toaster, coffee grinder, and other countertop appliances sit during a normal morning. A rail placed near those tasks can reduce trailing cords and keep frequently used outlets within reach. Measure the counter, then check the rail’s length and the manufacturer’s mounting requirements. Small details matter.

Keep the proposed position clear of sinks, cooktops, and areas exposed to routine splashes or heat. A tidy-looking location is not automatically a suitable one. Check appliance instructions, required clearances, and the power track manufacturer’s guidance before settling on a layout. Also consider upper cabinets, backsplashes, and whether plugs will be easy to insert and remove. Measure twice.

This guide explains how to compare practical locations, identify common planning mistakes, and prepare for installation. A frequent oversight is choosing a position based on an empty countertop rather than its busiest use. Sketch the appliance locations and note where cords would hang or cross work areas. Then ask a qualified electrician to assess the supply, mounting surface, and applicable local requirements. The best position should feel convenient without putting the rail or its connections in a vulnerable spot. When in doubt, pause and get the layout checked.
How to Decide Where to Install a Kitchen Power Track Rail

Understanding How a Kitchen Power Track Rail Works

How to Decide Where to Install a Kitchen Power Track Rail

Understanding How a Kitchen Power Track Rail Works

A kitchen power track rail supplies electricity through a fixed rail, with compatible outlet modules that attach along its length. The rail connects to a suitable power source, while its internal conductors carry power to each module. Depending on the system, modules may slide or lock into position. Their movement is useful, but they must be installed and used as designed.

Before choosing a location, check the rail’s rated load and the appliances you expect to plug in. A kettle and toaster used together can draw substantial power. Keep the rail away from sink splash zones, cooktop heat, and places where cords cross work surfaces. Think about how you actually prepare food: a spot near the chopping area may be handy, while one above a frequently used appliance could create clutter. That matters. I’d still measure twice, because the most convenient position can look different once cabinets and appliances are in place. Ask a qualified electrician to confirm the circuit, mounting method, and clearances for your specific system.

Assessing Appliance Needs and Electrical Requirements

Start by listing the appliances you expect to use along the kitchen power track rail. Check each appliance’s nameplate for its voltage and wattage, then consider which ones may run at the same time. A kettle and toaster can draw substantial power together. Do not plan around outlet count alone. A crowded rail may still overload its circuit. Measure the countertop and mark where appliances sit, including the space needed to open a mixer lid or lift a coffee maker’s water tank. Measure twice.

Then review the electrical requirements with a qualified electrician. The existing circuit, rail rating, grounding, and protective devices must suit the expected load and local requirements. A new rail does not automatically mean the circuit can supply more power. Keep the rail away from sinks and cooking splashes, and check the manufacturer’s required clearances before choosing a position. Make sure appliance cords reach without crossing hot surfaces or dangling over an edge. A tidy sketch can miss the awkward detail: the kettle handle may hit an upper cabinet. Recheck the layout with real appliances, or with their measurements, before installation.

Mapping Kitchen Work Zones and Suitable Rail Locations

Map the kitchen by tasks, not by wall length. Mark where you chop vegetables, use a mixer, charge a small appliance, and set down hot food. These work zones often overlap, but the busiest stretch of counter deserves the easiest access. A paper template or removable tape can help you test a rail position before installation. Walk through a normal meal. Notice where cords might cross your hands or block a drawer.

A rail may suit a dry prep counter or an appliance station along the backsplash. Keep it away from sink splash, direct cooking heat, and places where steam regularly collects. Check the rail’s specified clearances and installation instructions; a qualified electrician can assess the circuit, mounting surface, and local requirements. Measure with appliances in place, including their plugs and cord reach. Small details matter. A kettle cord that barely reaches can pull across the work area, while a rail hidden behind a tall mixer is awkward to use. The most symmetrical location is not always the most practical one. Recheck the layout during an ordinary cooking routine, when clutter reveals what the drawing missed.

Checking Clearances, Mounting Surfaces, and Safety Rules

Map daily tasks before measuring. Place the kettle near the prep space and the mixer where its cord will not cross a sink or hot surface. Check cabinet undersides, window trim, and appliance doors; a rail may seem clear until a door swings open. Use a tape measure and mark the proposed ends with painter’s tape. Keep the required clearances from sinks, cooktops, and heat sources, following the rail instructions and local electrical rules rather than guessing. Small gaps matter.

Inspect the mounting surface closely. Solid framing or suitable structural backing gives fasteners dependable support; plasterboard alone may not. On tiled walls, locate the backing before drilling, and check for concealed pipes and wiring. Confirm the rail’s load rating against the combined weight of connected appliances. An electrician should verify the supply, grounding, and circuit suitability, especially near water. Have power isolated and verified before wiring work. Measure twice. The layout may still feel awkward; mock it up with cardboard and a real appliance before drilling.

Kitchen Countertop Electrical Planning: Key NEC Dimensions

These general NEC countertop receptacle dimensions can help inform where to plan a kitchen power track rail. They are not rail-specific clearance or mounting instructions: verify the rail manufacturer’s requirements, use a suitable mounting surface, and check the electrical code adopted by your local authority. Island and peninsula rules may differ.

Choosing the Final Position and Installation Height

Mark the proposed position with painter’s tape before drilling. Stand at the counter and reach for the switches as you would while cooking. The rail should be easy to use without leaning across a hot pan or stretching over a sink. Check cabinet doors, extractor parts, and open shelves too. A position that looks neat on a drawing can feel awkward in daily use.

Choose the height around the people and appliances that will use it. Measure the tallest plug and check how its cord hangs; it should not drag across the counter or catch on a drawer. A few inches can change the reach, so test the tape-marked height from both standing and seated positions if needed. Keep access comfortable. My first layout often looks tidy on paper, then a kettle cord proves otherwise.

Before fixing the rail, confirm the wall or cabinet can support it and that the planned location suits the rail’s installation instructions. Keep it away from routine splashes, steam, and direct heat, and never assume a general height rule makes every location safe. Have a qualified electrician check circuit capacity, grounding, and applicable requirements. If the final position feels cramped, pause and adjust it; a small rethink now is easier than living with an inconvenient rail.

How to Decide Where to Install a Kitchen Power Track Rail - Choosing the Final Position and Installation Height

Use these dimensions as planning guidance, not as electrical-code requirements. Confirm the rail’s installation instructions, wiring method, and local rules before fixing its final position.

Decision Point Practical Planning Guide How to Choose the Final Position Checks Before Installation
Height above the countertop A useful starting range is to place the rail’s lower edge about 150–200 mm (6–8 in) above the finished countertop. Measure from the countertop surface to the rail’s lower edge. Adjust the height to keep plugs clear of the work surface while remaining easy to reach. Mock up the rail and a plug in place. Check clearance beneath cabinets and ensure the rail does not obstruct a backsplash shelf or trim.
Reference height Base the installation on the finished countertop, not the floor. Countertop height varies with cabinetry, flooring, and user preference. Mark the countertop’s finished level first, then measure upward to the proposed rail position. Account for the final flooring and countertop thickness if either is not yet installed.
Horizontal position Locate the rail along the backsplash where small appliances are normally used, such as a coffee maker, toaster, or food processor. Plan around actual work zones rather than centering the rail automatically. Keep the rail accessible without placing it behind appliances. Check that appliance cords can reach without crossing the sink, cooktop, or main food-preparation area.
Distance from the sink There is no single safe setback that applies to every kitchen, product, and jurisdiction. Keep the rail away from likely splash zones and choose a location that does not require users to handle plugs with wet hands. Confirm required separation, protection, and permitted locations with local electrical regulations and the rail manufacturer’s instructions.
Distance from the cooktop Heat, grease, and cooking vapour can affect electrical accessories; required clearances depend on the installation and local rules. Prefer a section of backsplash outside the direct heat and splash area of the hob or range. Check the appliance and rail manuals, including any specified clearance from heat sources and cooking surfaces.
Upper-cabinet clearance Leave enough room to insert, remove, and operate plugs and accessories without interference from cabinets, doors, or handles. Test the rail position with the largest plug or adapter you expect to use, including its full insertion and removal path. Open nearby cabinet doors and drawers to check for collisions and ensure the rail remains reachable.
Length and outlet coverage Choose a rail length that serves the intended work area without extending unnecessarily into wet or high-heat zones. Mark appliance locations and likely plug positions on the wall before deciding where the rail should begin and end. Make sure the rail does not cross joints, wall features, or areas where secure fixing is not possible.
Wall construction and wiring The required fixing method and electrical connection depend on the wall, rail design, and local installation rules. Choose a position with suitable support and a practical route to the electrical supply. Locate concealed pipes and cables before drilling. Have fixed wiring connected by a qualified electrician where required.
Final position check Temporarily mark the proposed rail and review it during normal kitchen tasks. Check reach, visibility, cord routing, cleaning access, and whether the rail is convenient for all regular users. Approve the exact height and location only after confirming product instructions and applicable local requirements.

FAQS

How does a kitchen power track rail supply electricity?

A fixed rail connects to a suitable power source. Internal conductors carry power to compatible outlet modules. Modules may slide or lock into place.

Where is a practical place to install the rail?

Near a dry prep counter or appliance station can work well. Keep it away from sink splashes, direct heat, and regular steam. Convenience can create clutter.

How can I test a location before installation?

Mark the proposed position with painter’s tape. Prepare a normal meal and check reach, drawer access, and cord paths. The paper plan may miss things.

What should I check about appliance cords?

Measure with appliances in place, including plug size and cord reach. Cords should not stretch, cross your hands, or hang over hot surfaces. A few inches matter.

How high should the rail be mounted?

Choose a height that feels comfortable for the people using it. Test switch access while standing, and seated if needed. Check tall plugs and hanging cords, too. No single height fits every kitchen.

Can several appliances use the rail at once?

Check the rail’s rated load and the appliances’ power needs. A kettle and toaster together can draw substantial power. Ask an electrician to confirm circuit capacity.

What should an electrician verify?

Ask a qualified electrician to check the circuit, grounding, mounting surface, and required clearances. Follow the system’s installation instructions. Guessing here is not worth it.

What obstacles should I check before installation?

Check cabinet doors, shelves, and extractor parts. Keep modules accessible and leave room for cleaning. It may look neat, but feel awkward.

Conclusion

Choosing where to install a kitchen power track rail starts with understanding how it works: appliances connect at different points along a fixed rail, offering flexibility compared with relying only on individual outlets. Begin by listing the appliances you expect to use and checking their power needs, plug types, and likely locations. This helps determine the rail’s length and whether the available electrical supply is suitable.

Next, map your kitchen’s work zones and identify a position that makes power accessible without obstructing food preparation or appliance use. Check clearances around cabinets, sinks, heat sources, and moving doors, and confirm that the mounting surface is sturdy and appropriate for installation. Follow applicable safety requirements and have electrical work assessed by a qualified professional when needed. Once these factors are considered, choose a practical position and height that keeps connections easy to reach while reducing cable clutter and avoiding interference with everyday kitchen tasks.

Henry

Henry

Henry is a dedicated marketing professional with a profound expertise in the company's offerings. With years of experience in the industry, he possesses an impressive understanding of the market dynamics and consumer behaviors that drive success. Henry is committed to sharing his insights through......